Travis-CI article publishing
Geeking out after switching back the blog to Pelican and hosting it on GitHub Pages, I decided to set up automated publishing of the HTML content from the markdown articles without manually running Pelican on my own PC. So what better way to do this than plug everything into Travis CI, because continuous integration doesn't automatically imply code.
Configuring the job
I'm not going to go through the whole set-up of having Pelican up and running, nor about how to configure GitHub pages in order to publish your blog, though those are some nice ideas for future articles :fa-lightbulb-o:.
The publishing flow would be as follows:
- Create a separate
article/article-namebranch on which to work on the article - Submit a pull request to the
sourcebranch once the article is finished - On pull request merge run a Travis CI job to get the latest changes, publish using Pelican and push the output back to the
masterbranch in order to make the changes public.
I am fully aware that this sounds so much more complicated compared to publishing an article using Wordpress for example, but it fits well into my mostly command line world, love and general geekiness.
The actual implementation can be split in two:
- Getting Travis CI to notice that a merge was made
- Telling Travis CI what to do once
1happens
1. Travis integration
Actually setting up Travis CI is pretty easy and their docs are amazing, so in short you flip a setting in your GitHub repository options and add a .travis.yml file which basically configures how a Travis CI job works.
My .travis.yml file is as follows:
language: python
python:
  - '2.7'
branches:
  only:
  - source
before_install:
  - "export TRAVIS_COMMIT_MSG=\"$(git log --format=%B -n 1 | head -c23)\""
install:
  - pip install -r requirements.txt
  - pip install git+https://github.com/fuzzmz/pelicanfly@font-awesome-4.3.0
script:
  - git config --global user.name "Serban Constantin"
  - git config --global user.email serban.constantin@gmail.com
  - make publish
  - make github
env:
  global:
  - secure: ASDASDADS
This file tells us that the scripts will run on Python 2.7, and to only run when changes happen to the source branch.
The next step is to tell Travis that before installing our required packages he should export the git commit message which prompted the build to the TRAVIS_COMMIT_MSG variable, which will then be used when pushing the HTML files to the master branch.
After that we go ahead and install all the packages required to publish the blog (Pelican, Markdown, etc), as well as a custom fork of one of the packages and configure git so that the correct author is displayed in the repository master branch after pushing the published content to it.
We then go ahead and actually publish the content via make publish and push it to GitHub using make github, functions which will get explained a bit further down.
One more thing that needs done is to have a way to let Travis push the changes back to the repo. This is done by generating a token on GitHub and encoding it using the travis ruby application so that others can't use said token to push to my repository.
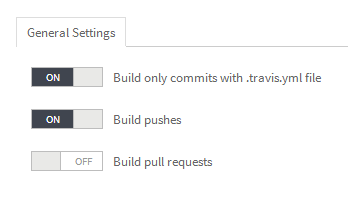
The last thing that needs to be done is to disable pull request builds in Travis CI to prevent the blog being updated by a pull request.
2. Travis commands
The actual steps to publish the blog and push it back to GitHub are detailed in the Makefile and called via make publish and make github.
PELICAN=pelican

BASEDIR=$(CURDIR)
INPUTDIR=$(BASEDIR)/content
OUTPUTDIR=$(BASEDIR)/output
CONFFILE=$(BASEDIR)/pelicanconf.py

clean:
    [ ! -d $(OUTPUTDIR) ] || rm -rf $(OUTPUTDIR)

publish:
    $(PELICAN) $(INPUTDIR) --debug --output $(OUTPUTDIR) --settings $(CONFFILE)

github:
    ghp-import -n -b master -m "${TRAVIS_COMMIT_MSG}" $(OUTPUTDIR)
    @git push -fq https://${GH_TOKEN}@github.com/$(TRAVIS_REPO_SLUG).git master
In the Makefile we define the current directory, the directory which holds the articles in markdown, the output directory which will store the generated HTML files as well as the path to the Pelican configuration file.
To publish the blog we simply run Pelican.
To push the changes to the repo so they become live we use ghp-import to simplify the process of committing the files and setting the correct branch (master in this case) and commit message, and then do a git push.
And that's it, now you just have to wait for the Travis CI build to take place, after which your content will be automatically made available.